| 일 | 월 | 화 | 수 | 목 | 금 | 토 |
|---|---|---|---|---|---|---|
| 1 | 2 | 3 | ||||
| 4 | 5 | 6 | 7 | 8 | 9 | 10 |
| 11 | 12 | 13 | 14 | 15 | 16 | 17 |
| 18 | 19 | 20 | 21 | 22 | 23 | 24 |
| 25 | 26 | 27 | 28 | 29 | 30 | 31 |
- SWIFTUI
- 아이폰
- 독후감
- viewcontroller
- 부트캠프
- Modality
- Codegen
- NumberFormatter
- Navigation
- 스위프트
- Info.plist
- View Life Cycle
- xcode
- 독서후기
- SWIFT
- NotificationCenter
- 스타트업주니어로살아남기
- Mock
- mvvm
- Failed to register bundle identifier
- UIResponder
- human interface guidelines
- contentInset
- Structures and Classes
- roundingMode
- @available
- 야곰아카데미
- 책후기
- delegation
- IOS
- Today
- Total
호댕의 iOS 개발
[iOS] 제너럴하게 사용할 수 있는 Custom PickerView를 구현해보자 본문

PickerView를 좀 더 커스텀하게 사용하려면 ActionSheetPicker-3.0 이런 외부 라이브러리도 존재한다.
GitHub - skywinder/ActionSheetPicker-3.0: Quickly reproduce the dropdown UIPickerView / ActionSheet functionality on iOS.
Quickly reproduce the dropdown UIPickerView / ActionSheet functionality on iOS. - GitHub - skywinder/ActionSheetPicker-3.0: Quickly reproduce the dropdown UIPickerView / ActionSheet functionality o...
github.com
Github 스타도 3400개 정도 받았지만, Objective-C로 구현이 되어 있고 22년 이후로는 커밋도 따로 없어서 관리가 엄청 잘 되고 있는 라이브러리라는 인상은 주지 못했다.
계속 지원한다는 말은 있었지만 iOS 13까지 지원이 되는 것 같았다.
아직은 앱 버전 타겟이 iOS 13으로 되어있어서 문제는 없지만 추후 버전을 올리거나 할 때 문제가 생길 수 있다고 판단하여 이번에 직접 커스텀이 가능한 Picker View를 Swift로 구현했다.
물론 지금 라이브러리에서 제공하는 정도로 커스텀 자유도가 높진 않지만, 현재 서비스에서 사용하는 Picker는 어느정도 양식이 정해져있었기 때문에 이 정도 커스텀이 가능하더라도 충분하다고 판단했다.
커스텀이 필요한 부분
- 데이터를 다양하게 받아 이를 Picker로 구현해줄 수 있어야 함.
- 버튼과 title의 이름
- 현재 설정한 selection을 지정할 수 있어야 함.
(적고 보니... 커스텀을 할 만한게 많이 없긴 했었다...)
구현해보기
1. Picker의 선택 요소로 다양한 데이터를 받아 이를 보여주기
일단 PickerView에서 가장 중요한 선택 요소를 받아서 이를 보여줄 수 있어야 했다. 어떤 식으로 데이터를 받아야 할 지 고민을 많이 했었는데 일단 배열 형태가 적합하다고 생각이 들었다.
UIPickerViewDelegate / UIPickerViewDataSource를 통해 값을 넣어줄 때에도 UITableView와 굉장히 흡사하게 넣어주는데 이때 배열 형태로 Data를 들고 있는게 가장 낫다고 판단했기 때문이다.
그리고 Picker의 Component가 항상 1개가 아니라 2개 이상이 될 수 있기 때문에 이를 이차원 배열로 받아야겠다고 생각했다.
그래서 이니셜라이저에서 content에 2차원 String 배열을 받을 수 있도록 했다.
그리고 UIPickerViewDelegate의 pickerView(_:viewForRow:forComponent:reusing:) 메서드에서 이 값을 넣어줘서 PickerView를 구성할 수 있도록 해주었다.
init(
    content: [[String]],
    contentType: ContentType,
    initialSelections: [(row: Int, section: Int)] = [(.zero, .zero)],
    parentViewController: UIViewController,
    targetView: UIView
) {
    •••
}

func pickerView(
    _ pickerView: UIPickerView,
    viewForRow row: Int,
    forComponent component: Int,
    reusing view: UIView?
) -> UIView {
    var label = UILabel()

    if let view = view as? UILabel {
        label = view
    }

    guard
        let contentComponent = pickerContent[safe: component],
        let item = contentComponent[safe: row]
    else {
        return UIView()
    }

    label.text = item
    label.font = .systemFont(ofSize: 17, weight: .regular)
    label.textAlignment = .center

    return label
}
Picker를 구성해주는 UIPickerViewDataSource와 UIPickerViewDelegate의 경우 진짜 TableView나 CollectionView의 DataSource / Delegate 함수들과 거의 유사하게 사용해주면 된다.
<UIPickerViewDataSource>
func numberOfComponents(in pickerView: UIPickerView) -> Int
몇 개의 Component로 Picker를 구성할 지 정해주는 함수이다.

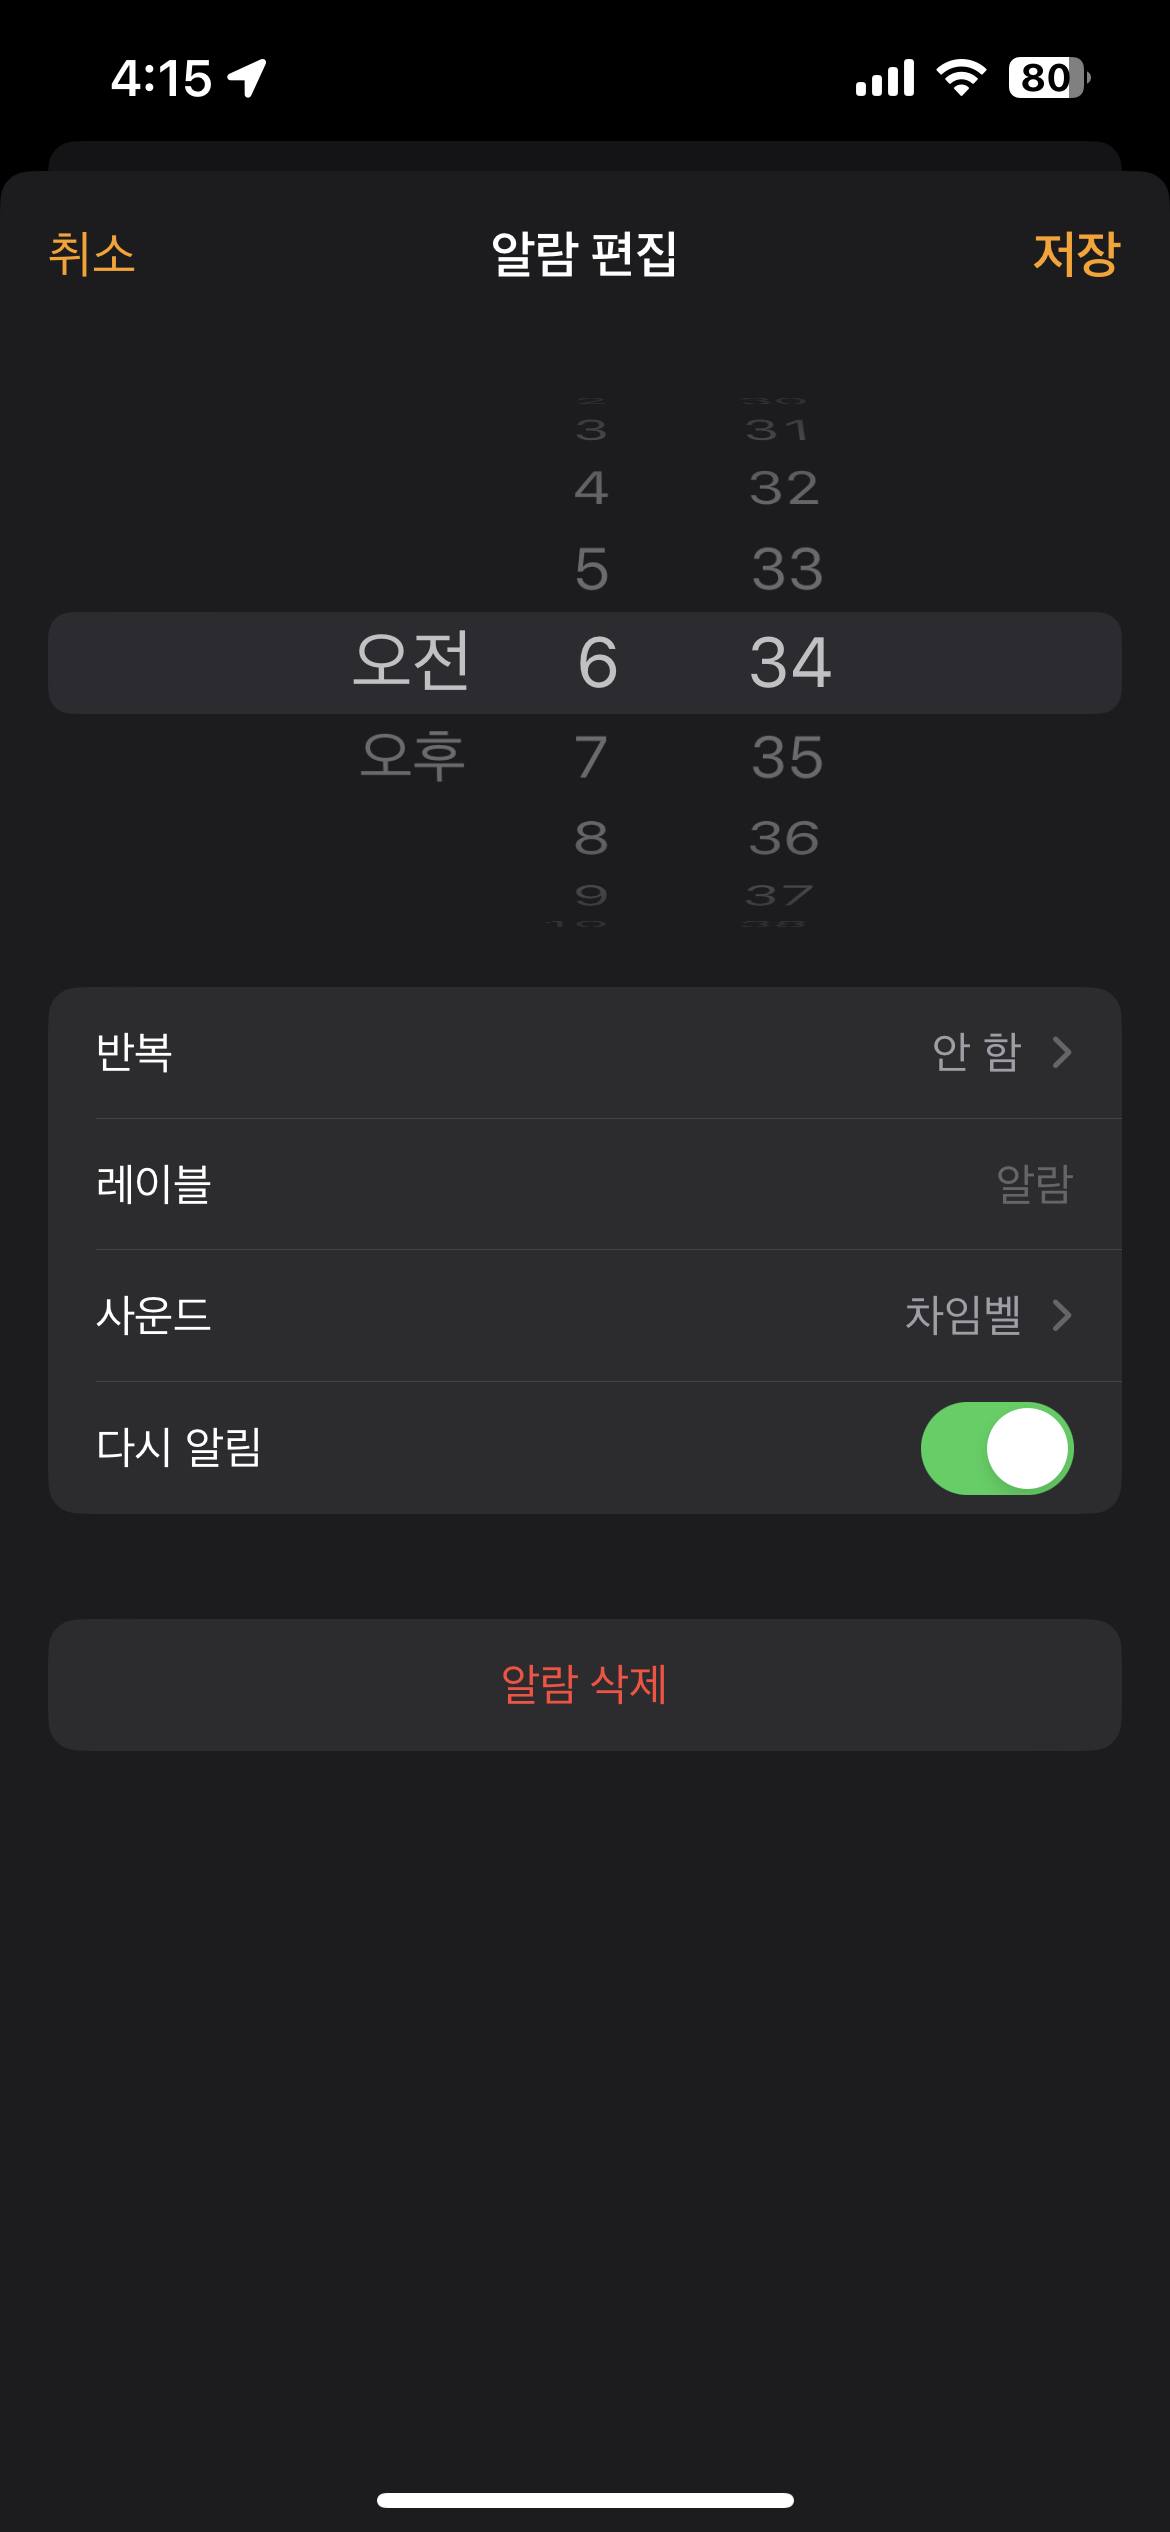
위 알림을 보면 오전/오후, 시간, 분 이렇게 3개의 Components로 구성이 되어 있는 것이다.
UITableViewDataSource의 numberOfSections 함수와 거의 유사하다고 생각하면 된다.
func pickerView(_ pickerView: UIPickerView, numberOfRowsInComponent component: Int) -> Int
여기서는 Component 당 몇 개의 Row로 이뤄져 있는지를 구성해주는 함수이다.
받았던 이차원 배열로 접근해서 각 Element들이 몇 개의 item으로 구성되어 있는지 Count해주면 될 것이다.
<UIPickerViewDelegate>
여기서는 PickerView의 높이와 너비, Content, 선택되었을 때 액션을 구현할 수 있다.
https://developer.apple.com/documentation/uikit/uipickerviewdelegate
Apple Developer Documentation
developer.apple.com
2. ToolBar 구현하기
그리고 ToolBar를 구현해야 했다. 이전에 PickerView를 사용했을 때에는 바로 UIToolBar를 사용했었는데, 지금은 커스텀을 위한 View를 구현하는 만큼 UIView에 버튼과 UILabel을 올리는 식으로 구현을 했다.
일단 ContentType을 열거형으로 선언을 해놓고 ToolBar의 구성에 따라 열거형을 선택할 수 있도록 했다.
(아직 '취소', '완료' 버튼이 있고 제목을 적는 식의 구성만 존재해서 열거형이 하나만 존재하긴 한다)
다만 이 방법의 경우 매번 케이스가 추가될 때마다 열거형을 추가해줘야 하는데 이러면 확장성이 오히려 떨어지는 것이 아닌가 싶기도 하다... contentType의 경우도 초기화를 해줄 때 선택할 수 있도록 구현을 해주었다.
enum ContentType {
    case normal(title: String, leftButtonTitle: String = "취소", rightButtonTitle: String = "완료")
}

init(
    content: [[String]],
    contentType: ContentType,
    initialSelections: [(row: Int, section: Int)] = [(.zero, .zero)],
    parentViewController: UIViewController,
    targetView: UIView
) {
    •••
    switch contentType {
    case .normal(let title, let leftButtonTitle, let rightButtonTitle):
        titleLabel.isHidden = false
        titleLabel.text = title

        leftButton.isHidden = false
        leftButton.setTitle(leftButtonTitle, for: .normal)

        rightButton.isHidden = false
        rightButton.setTitle(rightButtonTitle, for: .normal)
    }
    •••
}
3. 이니셜라이저 구현하기
이니셜라이저에 필요한 것들은 다음과 같다고 판단했다.
- content: Picker를 구성할 데이터
- contentType: Content의 타입
- initialSelections: 현재 선택된 선택지
- parentViewController: Picker를 띄울 ViewController
- targetView: Picker로 고른 내용을 띄워줄 View
init(
    content: [[String]],
    contentType: ContentType,
    initialSelections: [(row: Int, section: Int)] = [(.zero, .zero)],
    parentViewController: UIViewController,
    targetView: UIView
) {
    self.pickerContent = content
    self.targetView = targetView
    self.dismissPublisher = PublishSubject<SelectedResponse>()

    switch contentType {
    case .normal(let title, let leftButtonTitle, let rightButtonTitle):
        titleLabel.isHidden = false
        titleLabel.text = title

        leftButton.isHidden = false
        leftButton.setTitle(leftButtonTitle, for: .normal)

        rightButton.isHidden = false
        rightButton.setTitle(rightButtonTitle, for: .normal)
    }

    super.init(nibName: nil, bundle: nil)

    render()
    setAttributes(initialSelections: initialSelections)
    bind(contentType: contentType)
}
여기서 initialSelections로 받은 값을 통해 UIPickerView의 selectRow 함수로 선택된 값이 선택되서 사용자에게 보여질 수 있도록 해주었다. 그리고 Component가 2개 이상일 수 있기 때문에 이것도 row와 section으로 구성된 튜플의 배열로 구성해주었다.
4. PickerView를 사용할 수 있도록 하는 함수 만들기
이 함수는 인스턴스 메서드로 만들까도 고민을 했었지만 기존 라이브러리에서도 타입 메서드로 구현이 되어 있었기 때문에 사용을 할 때 타입 메서드가 더 익숙하지 않을까 해서 타입 메서드로 구현을 했다.
이 함수 내에서 pickerView의 인스턴스를 생성해주고 모달로 띄워주는 방식을 선택했다.
처음에는 완료 버튼에 대한 액션을 Delegate로 구현을 할 수 있도록 해줬으나, 현재 프로젝트에서 공통적으로 Rx를 사용하고 있기 때문에 Observable을 반환해서 subscribe를 해서 액션을 구현할 수 있도록 해주었다.
이벤트 자체는 PickerView에서 버튼이 눌릴 때 쏴주고 말이다.
그리고 함수에선 Argument를 PickerView의 이니셜라이저와 동일하게 해서 이를 통해 생성자에 주입해주도록 했다.
static func showWithPublisher(
    content: [[String]],
    contentType: ContentType,
    initialSelections: [(row: Int, section: Int)] = [(.zero, .zero)],
    parentViewController: UIViewController,
    target: UIView
) -> Observable<SelectedResponse> {
    let pickerView = PickerView(
        content: content,
        contentType: contentType,
        initialSelections: initialSelections,
        parentViewController: parentViewController,
        targetView: target
    )

    pickerView.modalPresentationStyle = .overFullScreen
    pickerView.modalTransitionStyle = .crossDissolve

    let navigationController = UINavigationController(rootViewController: pickerView)
    navigationController.setNavigationBarHidden(true, animated: false)
    navigationController.setEnableSwipeBack()
    navigationController.modalPresentationStyle = .overFullScreen
    navigationController.modalTransitionStyle = .crossDissolve

    parentViewController.present(navigationController, animated: true)

    return pickerView.dismissPublisher.asObservable()
}
이렇게 해서 어느정도 커스텀이 가능한 PickerView를 구현해보았다.
코드 자체는 크게 어렵지 않았지만 커스텀의 영역부터 제너럴하게 사용할 수 있도록 구현을 해야 했기 때문에 생각해볼 부분이 많았었다.
처음에는 완성했다고 생각했지만 실제로 해당 뷰를 적용해보면서 생각하지 못한 부분도 있었다.
(특히 선택된 Row를 유지하는 부분)
부족하거나 보완해야 할 점이 있다면 누구든 말씀해주세요!


